Yesterday I shared this faux glass butterfly and I’m back today to share how I stamped it.
If you try stamping onto window sheet, acetate, glass or any similar surface with our regular dye-based ink then the image won’t dry, it will simply sit on the surface of the window sheet and brush/smear off the first time it is touched. Stazon is a fast-drying, permanent ink that will work on non-porous surfaces such as window sheet but as we currently only stock it in black and white, that can be a little limiting.
The answer? Combine Stazon ink with our reinkers!
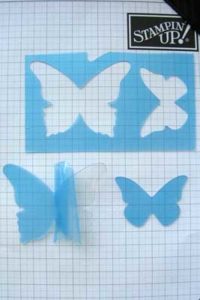
 1. First die cut your shapes from the thick window sheet. Top tip – keep the off-cuts to use as a stencil. The thick window sheet has a protective blue film on either side to protect the surface and you need to peel this away.
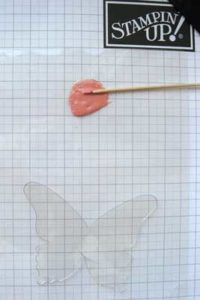
 2. On a protected surface (eg. scrap acetate/laminate) pour 3-5 drops of White Stazon. Add 1 drop of your chosen reinker and mix with a cocktail stick or similar. If you require a darker colour then you can always add another drop of reinker but it goes further than you might think, so better to build gradually than add too much and use a lot of Stazon to dilute it again.
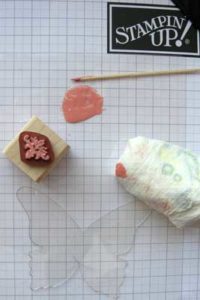
 3. Use wadded up kitchen paper to apply the ink to the stamp. You can get a better, more even coverage by using a sponge dauber but the dauber won’t clean up well after use.
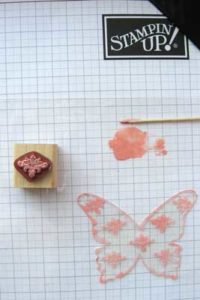
 4. Stamp the image onto the window sheet. Reapply ink to the stamp, stamp it out and repeat. You will need to work reasonably quickly as the ink dries out quite fast. Stamps should be cleaned straight after use with Stazon cleaner for best results.


Where can I purchase window sheet?
Hi Phyllis
You can buy it from a Stampin’ Up! demonstrator. I have a link here to my UK shop:
https://www2.stampinup.com/ecweb/product/142314/window-sheets?dbwsdemoid=5000438
If you’re not in the UK then a demo in your country can get hold of it for you. Hope this helps.
Sara xx
What is the name of the butterfly jpeg or die cut please? Thank you, your artistry is stunning!
Hi Cindy
Thank you for your question and kind words. It was the Beautiful Butterflies Bigz die so that it would cut through the Thick Window Sheet. Both products are retired from our catalogue now but you could get a similar effect with our regular Window Sheets and the Bold Butterfly Framelits (or similar) using the outline butterfly only. I just tested it out and recommend rolling back and forth through the Big Shot a couple of times without moving the die, for a nice clean cut.
Sara xx
Hi Sara,
Thank you so much for all the help. I just keep looking at your artistry and it is gorgeous. Eye candy for the Soul. 😉 Have a wonderful day and Thanks again!
You’re very welcome Cindy xx
Love this idea. Did make the butterfly, difficult tho. Stayzon dries extremely quickly. But please tell how the edges of the butterfly had the Stayzon applied.
I just used the same wadded up kitchen roll as though it was a sponge dauber. A sponge dauber will give a more even coverage but it’s very difficult to clean after.
This beautiful and I am anxious to try. Thanks
Can’t wait to try.
It’s an oldie but goodie 🙂
This is a wonderful idea. I can’t wait to try it myself. Thankyou.
Fantastic tutorial – this is so pretty! Must give it a go.. :o)
What a fab idea!