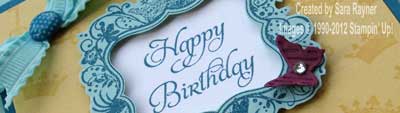
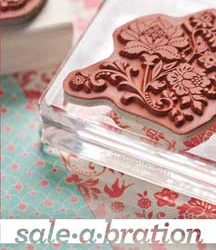
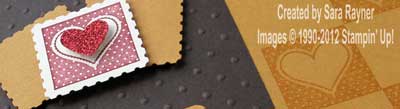
Monthly Archives: January 2012

An elegant birthday card? – it’s elementary my dear Watson!

elegant birthday card close up

Ooh, I couldn’t resist – either the reference or the stamp set Laughing.

And it’s not just because this gorgeous Sale-a-bration stamp set is free with a £45 purchase (though that’s probably reason enough), but also because this little set has a bit of everything; a frame (that works with our punches), sentiments and small images, ideal for creating backgrounds.

I liked the So Saffron, Pool Party and Island Indigo colour combo anyway, but then when I added the teeny tiny splash of Rich Razzleberry it seemed to really lift the card. Hope you like it.

elegant birthday card

Recipe
Stamp set: Elementary Elegance (W125120 or C125122) (Free Sale-a-bration set)
Cardstock: Pool Party (124391), Island Indigo (124390), So Saffron (108611), Rich Razzleberry (119981), Whisper White (106549)
Ink: Island Indigo (122937), So Saffron (104213)
Punches: Curly Label (119851)
Ruffled Ribbon: Pool Party (122975)
Embosslits Die: Beautiful Wings (118138)
Other: Designer Printed Brads (122940), Basic Rhinestones (119246)
Tools: Big Shot (113439), Paper Piercing Tool (116631), Mat Pack (105826)

The card base is a square of Pool Party. A mat of So Saffron was randomly stamped with the crown and key from the Elementary Elegance set in So Saffron ink. This was adhered direct to a mat of Island Indigo and a faux bow of Pool Party Ruffled Ribbon was secured to one corner with an Island Indigo Designer Pattered Brad before popping the layers up on the card front with dimensionals. The frame from the set was stamped in Island Indigo ink onto Pool Party card. After punching out the centre of the frame with the Curly Label the outside of the frame was hand cut. The sentiment was stamped in Island Indigo ink onto Whisper White card (trimmed to be a bit smaller then the frame) and adhered direct to the centre of the card front. Dimensionals were used to pop the frame up over the sentiment. To finish, a tiny butterfly was cut and embossed by running Rich Razzleberry card through the Big Shot sandwiched in the Beautiful Wings Embosslits Die. The butterfly was secured to the edge of the frame with a rolled up glue dot and a Basic Rhinestone adde to the body.

elegant birthday card inside Recipe
Stamp set:  Elementary Elegance (W125120 or C125122) (Free Sale-a-bration set), Happiest Birthday Wishes (W122615 or C122617) (Hostess set)
Cardstock: Whisper White (106549)
Ink: Island Indigo (122937), Pool Party (122938)

The Whisper White insert was stamped with the same crown and key in Pool Party ink to create a border and the sentiment stamped with Island Indigo ink.

Have you got a favourite Sale-a-bration product yet? if so then please leave me a comment and let me know which it is.

And of course if you need any help getting hold of that product then please email me.

Sara xx

January thank you cards

January thank you card close up

Time again to share the batch thank you cards that I’ve been making for my customers this month. Unfortunately the weather has been so bad recently that I didn’t get a pic of all of them lined up before I needed to pass them on. I did make a couple of spares though so at least I can share the design with you.

It features one of our fabulous Sale-a-bration stamp sets, that you can get for free, when you spend £45 on Stampin’ Up! products before 31 March 2012.

January batch thank you card

Recipe
Stamp set: Outlined Occasions (W126014 or C126016) (Free Sale-a-bration set), Creative Elements (W122645 or C122647)
Cardstock: Marina Mist (121682), Cajun Craze (121683), Crumb Cake (121685), Whisper White (106549)
Ink: Black Stazon (101406), Cajun Craze (119671)
Markers: Marina Mist (119679), Cajun Craze (Regals 119701)
DSP: Subtles Patterns Stack (117152)
Originals Die: Blossom Party (115971)
Tools: Big Shot (113439), Stamp-a-ma-jig (101049)

A small square Marina Mist card blank was stamped on the front with the large leafy design from Creative Elements in Cajun Craze ink. The Stamp-a-ma-jig was used to position the “so very much” sentiment from the Outlined Occasions in the bottom right corner of the card front, stamping with Cajun Craze ink again. Thanks was stamped onto Whisper White card with Stazon Black ink and then coloured in with Marina Mist and Cajun Craze ink. This was matted onto Crumb Cake card and then Cajun Craze card and popped up on dimensionals at an angle on the card front. Small flowers were die cut from Marina Mist DSP and Crumb Cake card and the flower centre from Cajun Craze card by running the Blossom Party die through the Big Shot machine. The petals of both flowers were curled slightly over the bone folder and then adhered together, popped up on a dimensional on the card front and the flower centre popped up on a dimensional to finish.

Please email me if you’d like to place an order and get hold of your own free Sale-a-bration products.

Thanks for stopping by.

Sara xx

Cupcake class now available online

Cupcake Class

If you liked the look of these projects but were unable to attend our recent in-person Cupcake Class, you now have a chance to purchase the online version of the class.

You get unlimited access to a password protected website that contains:

- full step by step photos and instructions to make all the card projects;
- shopping lists and cutting guides;
- class-exclusive alternatives to the projects;
- links to other cards that use the cupcake stamp set and punch on the Crafting and Stamping website.

To get immediate access to the projects just use the Paypal button below.

Card swaps from team training

Today I’m sharing the swaps I received from our Team Training last Sunday. It was great that so many were able to join in, even one who couldn’t make it on the day!

Our next team training day is on Saturday 21 April, so if you’d like to join us, then just email me for details on joining the team (as a hobby or business demo – both are very welcome). And of course while Sale-a-bration is running you’d get to choose an extra stamp set in addition to the regular bargain starter kit (over £250 of product for just £119 and fully customisable – swap stamp sets, card and inkpad colours etc. to suit your taste).

Now onto the swaps …

From Mari using Wedding Sweet and Beautiful Wings:

Mari swap

From Jan using Easter Blossoms:

Jan swap

From Krista using Patterns DSP Stack:

Krista swap

From Hazel using You Are Loved:

Hazel swap

From Chrissi using Valentine Love and En Francais:

Chrissi swap 1

and using Elementary Elegance (SAB):

Chrissi swap 2

From Joanne using Fresh Vintage (SAB):

Joanne swap

Aren’t they all gorgeous! Lucky me!

Have a great weekend.

Sara xx

Tip – create a trapdoor to access sweet treats

baby card

The treat cups are an ingenious way to give a special card and a gift in one. That gift could be low cost/value eg. a few sweets or high cost/value eg. jewellery. Although the simple way of using the treat cups is to remove the liner tape and adhere them direct to your card, this then means that to get into the treat cup, the recipient has to tear the card apart.

A more elegant solution is to create a trapdoor.

trapdoor open

Use the punched shape from the card front layer as a template and mark the aperture in pencil on the card front. Create a square just larger than the aperture, cutting three sides of it and scoring the side closest to the centrefold of the card. Fold along the hinge into the centre of the card.

trapdoor closed

Punch a large shape (the same 1-3/4″ Circle used for the aperture was used here). Secure the shape close to the trapdoor with a brad (before adhering the  card front layer to the card front). To open the trapdoor simply swing the shape to one side. The closer the brad is to the trapdoor, the more snugly the trapdoor will be kept closed. (My brad should have been closer to the trapdoor than it was here).


Baby card recipe

baby card close up

As promised I’m back with the recipe for this card. I just popped some cotton wool balls in the treat cup for demonstration purposes but you could add a small baby gift or fill with sweets for the new mother Laughing

baby card

Recipe
Stamp Set: Something Sweet (W117688 or C118589)
Cardstock: Pool Party (124391), Very Vanilla (106550), Whisper White (106549)
Ink: Pool Party (122938)
DSP:  Everyday Enchantment (126154)
Punches: 1-3/4″ Circle (119850), Large Oval (119855), Scallop Oval (119856)
Ruffled Ribbon: Pool Party (122975)
Other: Circle Treat Cups (116802)

The card base is a 5″ square  of Pool Party. Two of the DSP designs were cut into  1-9/16″ squares and adhered in a grid pattern onto a square of Whisper White card. The 1-3/4″ Circle was used to punch an aperture at the intersection of the four top left squares. A Circle Treat Cup was sandwiched between the card front and the DSP layer (pop back tomorrow to see how access to the cup contents is provided). The rattle handle was stamped in Pool Party ink onto Whisper White card, cut out and popped up on slivers of dimensional, butted up to the Circle Cup. A small bow of Pool Party Ruffled Ribbon was adhered to the rattle handle with a glue dot. The sentiment and the small heart were stamped in Pool Party ink onto Very Vanilla card, punched out with the Large Oval. This was matted onto a Scallop Oval of Pool Party and popped up onto dimensionals on the card front.

baby card inside

Recipe
Stamp Set: Something Sweet (W117688 or C118589), Curvy Verses (W104879)
Cardstock: Whisper White (106549)
Ink: Pool Party (122938)

A Whisper White insert was stamped with the sentiment and a bunch of small hearts using Pool party ink.


You can get the pack of 12″ x 12″ DSP used here just be placing any order of £45 or more. Here’s one suggested bundle that will meet that target and provide most of what you need to make this card.

Item Code Cost
Something Sweet Stamp Set (wood) 117688 £26.95
1-3/4″ Circle Punch 119850 £15.50
Circle Treat Cups 116802 £2.95
Everyday Enchantment DSP 126154 FREE
Total £45.40


To order this bundle or any other products, please email me.

I’ll be back tomorrow to show how the card is designed so that you can access the contents of the treat cup without ruining the card.

Sara xx


Sale-a-bration starts today!

Sale-a-bration

Yay!!! The sale-a-bration has started! From now until 31 March you can get your FREE sale-a-bration products by doing any of the following:

Spend
You’ll get a free Sale-A-Bration product when you spend £45 on Stampin’ Up! goodies, whether they’re from the main or the mini catalogue. There’s no limit – for every £45 you spend, you choose another Freebie!

Hostess
You’ll get a(nother) free Sale-A-Bration product when you host a workshop of at least £300 – that’s in addition to all of the regular benefits of hostess pounds and 50% off items that you can qualify for!

Join
Join my team during Sale-A-Bration and you can choose any stamp set—a value of up to £44.95—from the current Idea Book and Catalogue or the Mini! This is in addition to the other benefits you get. You can join (for just £119, getting more than £250 of products) and either run a business or be simply a hobby demo, getting discount on your own purchases. See here for more details.

And here are the Sale-a-bration (SAB) products:

Fresh Vintage Stamp Set - A delicate floral set that works with the new Postage Stamp punch. The large image is great for colouring direct to stamp with your markers and the border stamp is ideal for backgrounds and inserts.

fresh vintage

Sprinkled Expressions Stamp Set – a great combination of images and sentiments that can be used in combination or separately.

sprinkled expressions

Outlined Occasions Stamp Set – the outlined key words and the plain text can also be used in combination or separately. And they’re fun to colour in Smile

outlined occasions

Elementary Elegance –  This fabulous set has both images and sentiments and the dinky motifs will make great accents or backgrounds. It also works with:

  • the Curly Label punch to create frames or mats
  • Artistic Etchings – creating little and large versions
  • the new trinket crowns and trinket keys from the Mini.

Elementary Elegance

And last but far from least,

Everyday Enchantment DSP – these papers are so pretty and have quite subtle designs, making them ideal for scrapbookers, cardmakers and non-stampers. Of course as usual, they match our card, ink, ribbon etc and the patterns reflect both  the Fresh Vintage and Elementary Elegance SAB sets … so you’ll just have to collect the lot! Wink

everyday enchantment DSP

To place an order, book a workshop or join my team please email me or give me a call on 0775 1133886.

I’ll be back soon with a few projects that use the new SAB products and I have a few suggestions for product bundles that will qualify you for the freebies.

Sara xx

Happy Birthday Mari

windmill card close up

Happy Birthday Mari if you’re reading this!

I’m back with another guest designer to celebrate our family birthday today. DH made this card for Mari with only a little help from me.

He took his inspiration from this card in the current Idea Book and Catalogue but wanted to change it enough to make it his own.

SU! windmill card

He kept the windmill and birthday stamp but chose his own colour combo and layout and swapped the textured background. Do you still recognise it as the same card?

windmill card

Recipe
Stamp sets: Happiest Birthday Wishes(W122615 or C 122617 hostess)
Cardstock: Calypso Coral (124392), Pool Party (124391)
Ink: Calypso Coral (122939)
DSP: Domestic Goddess (122355)
Embosslits Die: Beautiful Wings (118138)
Textured Embossing Folder: Vintage Wallpaper (120175)
Other: Mini Brads (122941)
Tools: Big Shot (113439), Stamp-a-ma-jig (101049)

The base card is Calypso Coral matted with another layer of Calypso Coral that was run through the Big Shot using the Vintage Wallpaper folder. One large and three small windmills were created from Domestic Goddess DSP by taking a square of paper, cutting from each corner approximately 1/2-2/3 of the way to the centre and either folding or rolling the same edge on each corner into the  centre. The large windmill was topped with a small butterfly, pinned with a Mini Brad and the small ones just had a Mini Brad pushed through the centre. Using a stamp-a-ma-jig the sentiment was stamped in Calypso Coral ink into the centre of a strip of Calypso Coral card. It was repeat stamped on either side of the main sentiment, stamping off first for a paler effect. This was adhered direct to a slightly wider strip of Pool Party card and then to the card front.
Here’s the windmill close up.

windmill close up

The gift bag that I shared on Saturday was designed to colour co-ordinate with the card.

I’ll be back tomorrow with full details of our Sale-a-bration offer!

Sara xx

My swap cards for the team meeting

team swap card close up

We had our Stampin’ Up! team meeting today. Lots of fun! We shared  the latest updates on what’s happening at Stampin’ Up!, had a make and take, a demo, a card swap and shared lots of ideas and tips between us all. It was great how everyone chipped in and offered experiences and suggestions along the way (and it helps take the pressure off of those “presenting”).

This is the little duo that I made for swapping today.

team swap card

Recipe
Stamp sets: Perfect Postage (W126111 or C126113), Teeny Tiny Wishes (W115370)
Cardstock: More Mustard (106569), Early Espresso (121686), Very Vanilla (106550)
Ink: More Mustard (103162), Cherry Cobbler (119669)
Punches: Postage Stamp (122344), Word Window (119857), Modern Label (119849), Small Heart (117193)
Textured Embossing Folder: Perfect Polka Dots (117335)
Other: Red Glimmer Paper (121790)
Tools: Big Shot (113439), Stamp-a-ma-jig (101049)

The base card is More Mustard and it was pattern stamped at one end with the heart from the Perfect Postage using More Mustard ink and the Stamp-a-ma-jig to get the placement. (Tip – although I could have used Versamark and got the same effect I decided to use More Mustard so that the ink would dry quickly and I wouldn’t smudge it when moving the jig around). A short mat of Early Espresso was run through the Big Shot with the Perfect Polka Dots embossing folder and adhered direct to the card. Two Postage Stamps were punched from More Mustard card and popped up on dimensionals at angles. The heart was stamped again onto Very Vanilla card using Cherry Cobbler ink and punched out with the Postage Stamp before popping up on a dimensional in the centre of the other two. A Small Heart was punched from Red Glimmer Paper (a little goes a long way) and also popped up on a sliver of dimensional in the centre of the central stamped heart. A sentiment (everyone got to choose from Valentine’s of Thank you) was stamped in Cherry Cobbler ink onto Very Vanilla card and punched out with the Word Window. This was adhered direct to a Modern Label punched from More Mustard card and popped up on dimensionals on the card front.

team swap card insideRecipe
Stamp sets: Perfect Postage (W126111 or C126113), Valentine Love (W122695 or C122697)
Ink: More Mustard (103162), Cherry Cobbler (119669)

I left the swap cards blank on the inside as I couldn’t pre-guess which sentiment everyone would prefer. For my own sample though I stamped the sentiment from Valentine Love in Cherry Cobbler and stamped the Perfect Postage heart again in More Mustard.

team swap mini boxRecipe
Stamp sets: Perfect Postage (W126111 or C126113)
Cardstock: More Mustard (106569)
Ink: Cherry Cobbler (119669)
Punches: Petal Card Double (119273), Small Heart (117193)
Other: Red Glimmer Paper (121790)

I made the teeny, tiny, mini boxes again the same as here but stamping with Cherry Cobbler ink onto More Mustard Petal Cards and then topping one of the sides with a Small Heart of Red Glimmer Paper. They all had a Hershey’s Kiss inside them.

Our next team meeting will be on Saturday 21 April (avoiding Easter but still ahead of the next Mini Catalogue coming out). If you’d like to share in the fun, then please email me for details of how to join the team.

I’ll share all the swap cards I got in return for these, later in the week.

Sara xx

Blossom Party gift bag

gift bag close up

I’m slightly later than usual posting today. It’s my MIL’s birthday on Monday and so we’ve had a family day together today to celebrate. Of course that meant crafting for me and MIL. We’ve been busy getting our swaps ready for the team meeting tomorrow. I’ll share my swap tomorrow.

For today I’ve got the gift bag that I made to hold MIL’s gift. I know, it’s that flower again. I can make other variations on it honest, lol. Guess I’ll have to prove that soon Laughing

gift bag

Recipe
Cardstock: Calypso Coral (124392), Pool Party (124391)
DSP: Patterns DSP 2011-2013 In Color Assortment (122384)
Punches: Boho Blossoms (119858), Round Tab (119864),
Ruffled Ribbon: Pool Party (122975)
Originals Dies: Blossom Party (115971)
Tools: Big Shot (113439), Crop-a-dile (108362)

This bag is a variation of the bag in a box pattern that’s easily available on the internet. I resized it to hold the gift I have and decorated it with the blossom Party flowers again. As the bag is wider than usual, I added a central flower motif threaded with ribbon and tied in a bow to keep it closed and keep MIL from peeking.

Have a great weekend.

Sara xx