First of all, a big apology. Sorry to anyone who’s been trying to sign up for next Saturday’s Cupcake Class. Thankfully one of my lovely regulars phoned me because she was having problems booking and I found out that the Paypal button wasn’t working as it should. I thought it odd that I’d not had any bookings!
The Paypal button has been fixed now and I know from a few recent phone calls that there’s actually quite a bit of interest, so if you’d like to come along then please sign up before it fills up – I can’t guarantee that there’ll still be places left later in the week.
Now on to today’s card, which is a CASE for a challenge on a worldwide SU demo forum I belong to. Our challenge was to CASE (copy and share everything) a particular card from the US demo newsletter.
I’ve made a few changes with my version. Some changes were because we don’t have exactly the same supplies as they used, but also just because I like to put my own stamp on things (if you’ll pardon the pun).

Recipe
Stamp sets: Delicate Doilies (W122590 or C122592), You’re a Gem (W122268 or C122270)
Cardstock: Sahara Sand (121695), Poppy Parade (121694), Baja Breeze (116207), Lucky Limeade (124388), Whisper White (106549)
Ink: Poppy Parade (119782), Baja Breeze (111833), Versamark (102283)
Punches: 1-1/4″ Circle (119861), Lace Ribbon Border (122362), Scallop Edge Border (119882), Small Oval (120908), 1″ Circle (119868)
Originals Dies: Blossom Party (115971)
Other: Red Glimmer Paper (121790), Basic Rhinestones (119246), Linen Thread (104199)
Tools: Big Shot (113439), Crop-a-dile (108362), Stamp-a-ma-jig (101049)
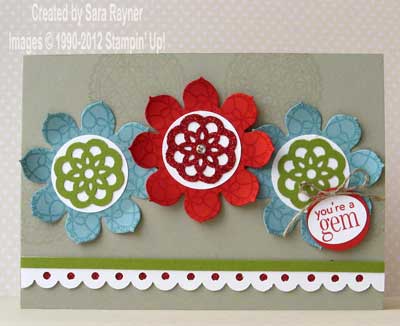
The card base is Sahara Sand which has been background stamped with one of the doilies in Versamark. Two Baja Breeze and one Poppy Parade large flower were die cut with the Blossom Party and then the Stamp-a-ma-jig was used to stamp them with matching inks and the large doily. The Lace Ribbon Border was used to punch Lucky Limeade and Red Glimmer Paper and the borders were trimmed down to just the central flower motif before adhering them to 1-1/4″ Circles punched from Whisper White card. Lucky Limeade centres were adhered direct to the Baja Breeze flowers and these were adhered direct to the card front. A Red Glimmer Paper centre was adhered to the Poppy Parade flower, which was then finished with a Basic Rhinestone before popping up on dimensionals in between the Baja Breeze flowers. A strip of Whisper White card was punched first with the Scallop Edge Border and then with the smaller hole of the Crop-a-dile. A narrow strip of Red Glimmer Paper was adhered behind the punched border and an even narrower strip of Lucky Limeade adhered to the top front of it. This border was adhered direct to the card front. The sentiment was stamped in Poppy Parade ink onto Whisper White card, punched out with the Small Oval and adhered direct to a 1″ Circle of Poppy Parade card. A rolled up glue dot was used to secure a Linen Thread bow to the sentiment before popping it up on a dimensional on the card front.
I hope that you can see from the close up at the top just how sparkly the Glimmer Paper is.
But why pay for Glimmer Paper when it’s cheaper to use glue and glitter? Well I can think of a number of reasons straight away:
- less mess
- very quick – no drying time
- the glitter doesn’t drop off or float all over the house (and husband and dog etc etc
 )
)
The last one is probably the main one in my book. DH is much happier not having to explain away the glitter when he gets in to work, heehee.
Enjoy the rest of your weekend.
Sara xx
 )
)


0 Comments