Monthly Archives: April 2012

A round up of my favourites from the Spring Mini

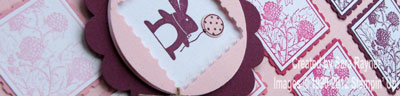
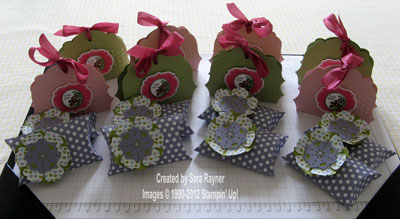
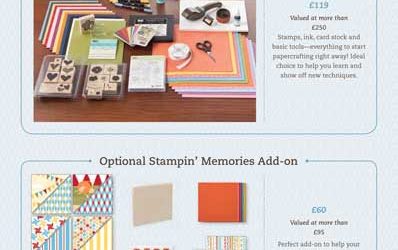
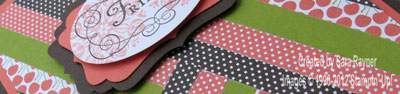
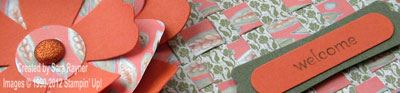
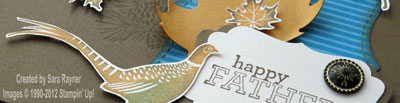
As today is the last day of the 2012 Spring Mini Catalogue, I thought I’d share some of my personal favourites, made with these products over the last four months. I’d love to know which were your favourites so that I can feed back to Stampin’ Up! HQ, so please leave me a comment if you have time.

If you’d like to see how any of those I’ve chosen were made, then just click on the link below each pic, to be taken to the original post.

Simply Adorned Jewellery

Create a Cupcake stamp set and matching punch

Blossom Party die and Red Glimmer paper

Marry Me stamp set

It’s cutting it a bit fine, but there are still a few hours left to get hold of any of these goodies, so email me if you’d like to order any of them.

Please stop by again tomorrow as it’s a big day in our Stampin’ Up! world. I’ll have the new catalogue online to share, lots of exciting news and offers and the extra bonus treat of an In Love With Stamping Blog Hop – providing inspiration for how to use all the new stamps, papers, tools and other products from the Summer Mini Catalogue. The full blog hop should be available from 10am, but as there are usually a few gremlins in the system, leaving it a little later wouldn’t be a bad idea Wink

Sara xx

Going, going …

… gone! By tomorrow evening this Perfect Postage stamp set, the 2-3/8″ Scallop Circle and Postage Stamp punches will all be gone from our current product range and we won’t know whether we will get them back until October. They may make it through to the 2012-2013 Idea Book and Catalogue but they may not (I so hope they do).

I’ve used them today to make a card for this week’s Mojo Monday card sketch, which is this:

And here’s my take on it:

Recipe
Stamp sets: Perfect Postage (W126111 or C126113), Tiny Tags (W118091 or C118592)
Cardstock: Pink Pirouette (116203), Pretty in Pink (106568), Regal Rose (108612), Melon Mambo (119980), Rich Razzleberry (119981), Whisper White (106549)
Ink: Pretty in Pink (101301), Regal Rose (105211), Melon Mambo (115656), Rich Razzleberry (115658)
Punches: 2-3/8″ Scallop Circle (118874), Postage Stamp (122344), 1-3/4″ Circle (119850), Jewelry Tag (117190), Owl Builder (118074)
Other: Linen Thread (104199)

The card base is an A6 portrait of Pink Pirouette card. The blackberry postage stamp was stamped out three times each in Pretty in Pink, Regal Rose, Melon Mambo and Rich Razzleberry inks onto Whisper White card. After cutting out, each square was adhered direct to a Postage Stamp punched from the matching colour card and the stamps were all adhered direct to the card front, starting with the lightest colour at the bottom. The bunny was stamped in Rich Razzleberry ink onto Whisper White card and punched out with the 1-3/4″ Circle. Using the Rich Razzleberry ink again to stamp the bunny’s balloon onto Pink Pirouette card, it was punched out using the middle “eye” of the Owl Builder and then adhered over the original balloon. This layer was adhered direct to a 2-3/8″ Scallop Circle punched from Rich Razzleberry card. A Postage Stamp was punched from Pink Pirouette card, then the 1-3/4″ Circle was centred over the aperture and punched again. This aperture layer was popped up over the bunny using slivers of dimensionals and then the whole topper was popped up on the card front using more dimensionals. The 4 You sentiment was stamped in Rich Razzleberry ink onto Pink Pirouette card and punched out with the Jewelry Tag. Two more Jewelry Tags were punched from Rich Razzleberry card. The three tags were tied onto the frame of the aperture with Linen Thread and another sliver of dimensional popped behind them to keep them in place.

Last chance to order?!? Email me if I can help Smile

Sara xx

New Summer Mini Catalogue launches 1 May

I’m enjoying a nice glass of wine and just chilling a little, after a busy and fun couple of hostess events, in the company of a lovely bunch of ladies.

My hostesses are great enthusiasts for crafting generally and Stampin’ Up! products specifically and although they’ve already been received lots of great freebies with their workshop orders, I really appreciate them opening their home to me and I like to spoil them a little more.

I’ve been extra busy the last few days working on samples to share with them and on their little gifts. Here’s a sneak peek of their gifts:

The samples mean that I’ll have lots to share with you when the Summer Mini launches on Tuesday 1 May and I’ll be taking part in a blog hop which goes live (hopefully) at 10am on the same day.

If you’d like a copy of the new Summer Mini catalogue then please email me and I’ll get one out to you.

And the start of the Summer Mini means the end of the Spring Mini so there’s only a couple of days left to order from that catalogue. If you can get your order (over £25) to me before 9pm Sunday night (29th April) I’ll pay the postage. Please note that this is an offer exclusive to me, not an SU! offer but it can be combined with the free pack of DSP offer if you spend over £45. Just email me your order and I’ll take care of the rest.

Sara xx

Breaking News – Change to Starter Kit

Yes, we have a huge change to the Starter Kit – from 1 May, we’re going to be offering a fully customisable Starter Kit for new recruits at a new lower price of £99!

When you join Stampin’ Up! on/after that date, the choice will be yours to put together a kit with any of our current high-quality products–you can choose up to £130 worth of any Stampin’ Up! products. Make it a cardmaking starter kit, a scrapbookers starter kit, a Big Shot starter kit … in other words, make it your starter kit! You’ll also receive a business supplies pack (valued at £45) to create a kit with a total value of £175 that still ships for FREE!

This change will mean lots more flexibility for everyone and is especially ideal for those who might already have bought some of the kit contents or who want products other than stamps (eg. punches or dies).

Now whilst the new kit is a more affordable starting price, great value (up to an extra £30 of products for free) and the flexibility is fantastic, there’s still a few days left for you to bag the brilliant bargain that is our current starter kit.

With the current starter kit, available until Monday afternoon, (but we need to get paperwork sorted before then!) you can get a whopping £235 of products plus the business supplies pack (making it over £280 total) for just £119!

A full breakdown is shown below.  This kit also ships for free and is partly customisable – items shaded green can be swapped for alternative stamp sets/colours etc!

Anyone wanting to order this current kit option will need to get the paperwork completed and to me by Sunday evening so that I can be sure of getting it to Head Office before the change takes place. The good news is that we can do it by scanning and emailing.

There’s more information on all the benefits of getting the starter kit and joining the Stampin’ Up! team, here.

If you’re interested in getting either the current or the new starter kit then please email me or give me a call on 0775 1133886 as soon as you can.

Sara xx

Herringbone technique card

A final share from our team training event last week – I made this card following the great demonstration that Hazel showed us. This herringbone pattern card is super easy when you use the SU! Multipurpose Adhesive Sheets and is a fabulous way to use up scraps.

We shared a few more techniques and card designs, but I’m saving those to use and demonstrate at my workshops over the next few weeks Smile if you’d like to book one then please email me.

Recipe
Stamp sets: Charming (W116519 or C125829), You’re A Gem (W122268 or C122270)
Cardstock: Early Espresso (121686), Calypso Coral (124392), Whisper White (106549)
Ink: Early Espresso (119670), Calypso Coral (122939)
DSP: Berry Blossoms  (122350)  (free with £45 order during April)
Punches:  Decorative Label (120907), Extra-Large Oval (119859)
Other: Big Shot Multipurpose Adhesive Sheets (120805)
Tools: Stamp-a-ma-jig (101049)

The card base is an A6 portrait of Early Espresso card, matted with Calypso Coral. A mat was made for the card front using the herringbone technique and this was adhered direct. The frame from the Charming set was stamped onto Whisper White card and the circle motif from the same set was stamped on either side of the frame (using the Stamp-a-ma-jig for positioning), stamping off first to get a paler colour. Early Espresso ink was used to stamp the Friend sentiment in the centre and then punched out with the Extra-Large Oval. Two Decorative Labels were punched from Early Espresso card, each cut in half and matted behind another Decorative Label punched from Calypso Coral. The Oval was popped up in the centre of the Labels using dimensionals and then all popped up on more dimensionals on the card front.

There’s not much time left to guarantee getting products from the Spring Mini catalogue and I’m just about to place what I guess will be my final order from it. As a special bonus to my blog readers, I’m offering free postage on any orders over £25, placed with me before 9pm Sunday night (29th April). Please note that this is an offer exclusive to me, not an SU! offer but it can be combined with the free pack of DSP offer if you spend over £45. Just email me your order and I’ll take care of the rest.

Sara xx

A bronze card to celebrate a team promotion

Here’s another card that I made for the team training event last Saturday. This one was to celebrate my downline, Krista, promoting to Bronze 2. She actually got her promotion a month or so ago, but this was the first time we’d met up since and it was great to share the celebration with the rest of the team. I made this card for her and gave her a few little crafting goodies too.

Recipe
Stamp sets: Number It (W122580 or C122582), Curly Cute (W117014 or C120510)
Cardstock: Soft Suede (119982), Very Vanilla (106550)
Ink: Versamark (102283)
DSP: Mocha Morning Specialty (122366)
Punches:  1-3/8″ Circle (119860)
Bigz L Dies: Perfect Pennants (123126)
Other: Gold EP (109129), Metallic Brads (119741)
Tools: Heat Tool (110197), Big Shot (113439), Sponge Daubers (102892), Bone Folder (102300), ???

The card base is an A6 portrait of Soft Suede, matted with Mocha Morning Specialty DSP. The number 2 was stamped in Versamark onto Very Vanilla card, heat embossed with Gold EP and cut out. It was shaped and curled over two stacked dimensionals on top of a 1-3/8″ Circle punched from Soft Suede card and Antique Brass brads added either side to add to the shaping. A medallion was die cut from Soft Suede card using the Perfect Pennants and “ribbons” of more Mocha Morning DSP were shaped, trimmed and adhered behind the medallion. A rosette of the same paper was adhered in the centre of the medallion  (if only there was a tool to make creating them easier, or maybe there is? Foot in mouth). The number was adhered on top and the rosette popped up on dimensionals on the card front. The sentiment was stamped in Versamark onto a strip of Very Vanilla card, heat embossed with Gold EP, sponged around the edges with Soft Suede ink and popped up on the card front with dimensionals.

Thanks for stopping by.

Sara xx

Welcome to the team

We had a new addition to our team when we all met up on Saturday and so I created this card for her, to go along with some small gifts to add to her crafting basket.

June is actually in my downline Jan’s team but we all mingle and craft together, so I wanted to say welcome to her.

Recipe
Stamp sets: Petite Pairs (W122495 or C122497)
Cardstock: Always Artichoke (108610), Tangerine Tango (116206)
Ink: Always Artichoke (105219)
DSP: Paisley Petals (122367)
Punches:  Modern Label (119849), Word Window (119857)
Bigz Dies: Top Note (113463)
Bigz L Dies: Fun Flowers (121812)
Other: Brights Glimmer Brads (121006)
Tools: Big Shot (113439), Bone Folder (102300)

The card base is an A6 Landscape of Always Artichoke, matted with Tangerine Tango card. A woven mat was made with strips of Paisley Petals DSP adhered to some scrap card and this was run through the Big Shot with the Top Note die. This woven background was adhered direct to the card front. Using the Fun Flowers die, large and small flowers were die cut from Tangerine Tango card and medium flowers and the centre were die cut from Paisley Petals DSP. The petals were all shaped with the bone folder and the flowers layered and secured with a Pumpkin Pie Glimmer Brad before popping up on the card front with dimensionals. The sentiment (selectively inked from Welcome Baby), was stamped in Always Artichoke ink onto Tangerine Tango card and punched out with the Word Window. A Modern Label of Always Artichoke card was matted behind and the sentiment was popped up on dimensionals on the card front.

I love creating cards for crafters as they really appreciate the work that goes into them. June noticed and commented on the weaving which made it so worthwhile Smile

Sara xx

Spoiler alert – swaps from team training

I’m back as promised, with pix of our swaps from yesterday’s team training. Now,  the first batch are all using current products but please note that some of the ones further down this post use products from the new Summer Mini catalogue, launching 1 May. If you don’t want to spoil the surprise then you’ll need to avoid scrolling too far down Smile

From Mari – a little box/bag of toffees

From Krista – a basket of chocs

and a punch art bunny

From Joanne – a dinky origami basket

And now, using new products

*

*

*

From June –  a masculine card front

From Jan – a delicate monochrome card

From Hazel – a pocket tissue holder made from fabric

And my own swap for everyone else – a handbag gift bag, sized to hold small square cards

Although our guests yesterday weren’t able to take part in our swap we made sure that no-one went home empty handed. Everyone took part in the make and take and we had several prize draw winners too!

If you’d like to come along to our next team training event, either as a team member or as a guest, then please email me to let me know you’re interested.

Sara xx


Catty case

I’ve had a fabulous day today with my team and some guests at our Team Training event. We had lots of sharing and swapping going on, of ideas, techniques and finished projects … and plenty of discussion of new products coming out on 1 May … and lots of fun!

I’ll share pix of the swaps tomorrow but for today, I’ve got a cased card (or two).

When my neighbour came around for her Friday coffee and craft session yesterday, she asked to make a Father’s Day card and wanted to case a card from our main catalogue. Of course we put our own stamp (pun intended Laughing) on the design by making a few changes.

I opted to add a splash more colour but wish I’d made the background paper a little narrower now.

Recipe
Stamp sets: Autumn Days (W115452), Delightful Dozen (W122650 or C122652)
Cardstock: Soft Suede (119982), More Mustard (106569), Very Vanilla (106550)
Textured Cardstock: Soft Suede (Neutrals 121078)
Ink: Soft Suede (115657), More Mustard (103162), Tempting Turquoise (100814)
DSP: Brights Patterns (117155)
Punches:  Decorative Label (120907)
Crochet Trim: Chantilly (118480)
Originals Dies: Leaves 2 (113459)
Bigz Dies: Top Note (113463)
Other: Antique Brads (117273)
Tools: Big Shot (113439), Sponge Daubers (102892), Bone Folder (102300)

The card base is an A6 landscape of Soft Suede card. The pine cones were stamped direct to the centre front of the card with Soft Suede ink. Using the Top Note die, a strip of Tempting Turquoise DSP was shaped and then sponged around the edges with Soft Suede ink. Chantilly Crochet Trim was wrapped around the DSP before adhering over the side of the pine cones. A very thin strip of Textured Soft Suede card was adhered down the centre of the Crochet Trim. A large maple leaf was die cut from More Mustard card with Leaves 2 and shaped with the Bone Folder before adhering direct to the front of the card. Tiny maple leaves were inked with More Mustard and Soft Suede inks using the rock and roll technique before cutting out and popping up on the card front using slivers of dimensionals. The sentiment was stamped onto Very Vanilla card with Soft Suede ink and punched out with the Decorative Label. Another Decorative Label was punched from Soft Suede card, cut in two and trimmed before matting behind the sentiment. An Antique Brad was added and then the sentiment popped up on dimensionals on the card front. Finally, the pheasant was inked with More Mustard and Soft Suede and Tempting Turquoise inks dabbed on with Sponge Daubers before cutting out and popping up on dimensionals overlapping the sentiment.

This is Alison’s version, with a little more direct stamping and Textured Very Vanilla card instead of DSP:

And on the inside:

Recipe
Stamp sets: Autumn Days (W115452), Curly Cute (W117014 or C120510), For My Family (W124403 or C124405)
Cardstock: Very Vanilla (106550)
Ink: Soft Suede (115657)

The pine cones and sentiments were simply stamped onto the Very Vanilla insert with Soft Suede ink.

Back tomorrow with pix as promised.

Sara xx

Cherry picked

The Fruit and Flowers set is a great set for creating your own background papers – and you don’t need to confine them to cards. Why not use your “papers” for boxes too?

To give a little more strength, I used the Confetti White card as my base for stamping this little box.

Recipe
Stamp sets: Fruits & Flowers (W122605 or C122607)
Cardstock: Confetti White (106557), Real Red (106578), Old Olive (106576)
Markers: Real Red (100052), Old Olive (100079)
Punches:  1-3/4″ Scallop Circle (119854), 1-3/8″ Circle (119860), 1-1/4″ Circle (119861)
1/8″ Taffeta Ribbon: Real Red (119251)
Bigz Dies: Pillow Box (113466)
Tools: Big Shot (113439)

The “background paper” was made by colouring the cherry stamp direct with Real Red and Old Olive markers (using the flat edge rather than the nib of the marker so as not to spoil the marker) and stamping across the Confetti White card, recolouring in between each stamping. Once the background was made, it was die cut with the Pillow Box and assembled. Real Red Taffeta Ribbon was tied around the box in a bow. The cherries were stamped once again, as for the background paper, onto Confetti White card and punched out with the 1-1/4″ Circle. This was matted onto a 1-3/8″ Circle punched from Old Olive, popped up on dimensionals onto a 1-3/4″ Scallop Circle punched from Real Red card and popped up onto the box front with more dimensionals.

I plan on putting some cherry flavoured sweets in this now.

Looking forward to seeing some of you at our Team Training event tomorrow Laughing

Have a great weekend, wherever you’ll be.

Sara xx