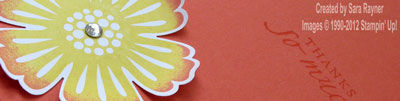
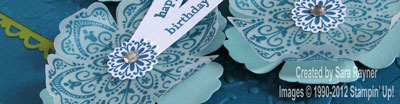
Monthly Archives: May 2012

Blossoms are great in batches

Today’s Blossom card shows just how well suited this stamp set and matching punch is for making a big batch of cards (I promise I’ll move onto other stamp sets soon, honest Laughing).  This design is simple, quick and doesn’t use too many supplies. In this bright and cheery colour combo, it’s perfect for mailing out with the Summer mini catty to my customers. Not got a copy yet? Just email me and if yours isn’t yet in the post, then I’ll get on to it straight away.

I used the thank you sentiment for this particular card but this could so easily be turned into an invitation (weddings, summer BBQs, birthdays etc) with a simple change of sentiment.

Recipe
Stamp sets: Mixed Bunch (W125535 or C125537), Sincere Salutations (W105156)
Cardstock: Calypso Coral (124392), Whisper White (106549),
Ink: Calypso Coral (122939), Daffodil Delight (119667)
Punches: Blossom (125603)
Other: Basic Rhinestones (119246)

The card base is an A6 portrait of Calypso Coral. Calypso Coral ink was used to stamp around the edges of the card front with the divided petal flower, starting in the lower left corner and stamping off. The solid flower was stamped onto Whisper White card, using Daffodil Delight and Calypso Coral inks and the rock ‘n’ roll technique. This was then punched out with the Blossom punch.  The petals were curled slightly with a bone folder and the flower adhered direct to the card front. A Basic Rhinestone was added to the centre of the rock ‘n’ rolled flower to finish.

Now to get this batch finished and posted in time for the weekend I hope!

Sara xx

More blossoms for my friends

I made a small bunch of these cards, with different sentiments, for some of my crafting friends today. The ornate flower has really grabbed me (I know, I can’t stop using it Laughing) but I made an effort today, to use one of the other flowers in the set and the more solid flower stamp is great for using with the rock ‘n’ roll technique as I did here.

Recipe
Stamp sets: Mixed Bunch (W125535 or C125537), Teeny Tiny Wishes (115370)
Cardstock: Island Indigo (124390), Pool Party (124391), Whisper White (106549),
Ink: Island Indigo (122937), Pool Party (122938)
DSP: Twitterpated (125406)
Punches: Blossom (125603), Modern Label (119849), Word Window (119857)
Other: Basic Pearls (119247)

The card base is an A6 landscape of Island Indigo. This was matted with strips of Twitterpated DSP top and bottom. Using Island Indigo ink, the ornate flower was stamped onto Whisper White card and punched out with the Blossom. Two solid flowers were stamped onto more Whisper White card, using Pool Party and Island Indigo inks and the rock ‘n’ roll technique. They were then punched out with the Blossom as well.  Three full blossoms don’t fit so easily on this size of card and so the two solid flowers were trimmed off a little at each side (removing the centre petal and the first divided segment of the next two petals). The petals were curled slightly with a bone folder and these flowers adhered direct to the card front. A further Blossom was punched from Pool Party and layered with the ornate flower using dimensionals with more dimensionals to attach it to the card front.  After stamping the sentiment in Island Indigo ink onto Whisper White card it was punched out with the Word Window, adhered direct to a Modern Label punched from Pool Party card and popped up on the card front with dimensionals. Basic Pearls were added to the centres of the flowers to finish.

Thanks for stopping by.

Sara xx

A quick and easy box

I’ve been using my Scoring Tool again today to make this really quick and easy box. Ideal for a small set of notelets and envelopes or for a few chocs.

Recipe
DSP: Sweet Shop (125408)
Punches: 1″ Circle (119868)
Tools:  Simply Scored Scoring Tool (122334)

Being a good Yorkshire lass and not liking any waste Wink, I cut both sheets of Sweet Shop DSP to 6″ x 6″ and scored at 1″ from all four edges on both sheets. The 1″ Circle punch was used to punch a semi-circle mid way along opposite edges of the box lid. I snipped the corners of both the lid and the base and folded them in and adhered them, tucking just a little tighter on the box base so that the lid fits (snugly) over the top.

The Scoring Tool is just perfect for making boxes of all sizes.

Sara xx

Quick reminder – free convention ticket offer – closes soon

Just a quick reminder that if you join Stampin’ Up! (hopefully as one of my Paper Dolls team Smile), before the end of May, you will receive FREE Convention 2012 registration* – a £149 value!  How fantastic is that!

If you read about our Regional Training last weekend (here, here and here), then you’ll have picked up a little taste of what convention is like … but multiply it by a factor of between about 4 and 8!

We have more free stamp sets, more prizes (SU! are giving all attendees extra giveaways depending on how many attend convention and we’ve already hit our first target!), more inspiration, more swaps. More everything!

I’m all booked – my convention ticket, my flights and my hotel – all done! And at least 5 other teammates all booked, with possibly more yet to do so, so you’re guaranteed to have company if you decide to come with us Laughing

And don’t forget that you can now join for only £99!!

We’re now offering a fully customisable Starter Kit at a new lower price of £99!

Now, when you join Stampin’ Up! the choice is yours to put together a kit with any of our current high-quality products–you can choose up to £130 worth of any Stampin’ Up! products. You’ll also receive a business supplies pack (valued at £45) to create a kit with a total value of £175 that still ships for FREE!

Click here to email me and  join now!

This is fantastic flexibility for those who might already have bought some of the kit contents or who want products other than stamps (eg. punches or dies).

So, just to cover what you’re getting:

  • up to £130 worth of any Stampin’ Up! products
  • a business supplies pack  (valued at £45)
  • free postage on your starter kit
  • discount on your future orders
  • monthly magazine
  • access to demonstrator-only websites full of information and inspiration
  • previews and pre-orders from the new catalogues
  • access to my team blog and invites to our team training events

… and a whole lot more (click here for more details) for just £99!

And your free convention ticket if you join before the end of the month (we need to get the paperwork to SU! no later than 2pm on Thursday 31 May).

I’d love to have you join my Paper Dolls team and join us at this year’s convention!!

To join, just email me and I’ll give you a call to chat about all the kit options.  You’ll receive a welcome email from Stampin’ Up! and from me, followed up by a welcome package from me by snail mail!

Hope to chat to you soon.

Sara xx


*Please note:

  • Offer is for free Convention 2012 registration only; it does not include airfare/travel to or accommodations while at convention.
  • Convention 2012 is being held 2-3 November 2012 in Mainz, Germany.
  • If for any reason a demonstrator is not able to attend Convention 2012 in Mainz, Germany–including being unable to register due to convention capacity being reached–she will forfeit her prize.
  • Recruit must be an active demonstrator to attend convention.
  • The free convention registration is NON-TRANSFERRABLE (no exceptions).

Another Mixed Bunch Blossom card

I hope that the weather is treating you as kindly in your part of the world as it is in ours and that you’re gearing up for a great weekend.

I’ve been busy again with my free Mixed Bunch stamp set, to create this thank you card – teaming it with some of the gorgeous Twitterpated DSP and lush Pleated Satin Ribbon (you only need a little of this to really make a card special).

Recipe
Stamp sets: Mixed Bunch (W125535 or C125537), Delightful Dozen (W122650 or C122652)
Cardstock: Riding Hood Red (116205), Basic Gray (121689), Whisper White (106549),
Ink: Whisper White Craft (101731), Riding Hood Red (111836)
DSP: Twitterpated (125406)
Punches: Blossom (125603), Scallop Trim Border (118402), Scallop Trim Corner (118870), Modern Label (119849), Word Window (119857)
Pleated Satin Ribbon: Riding Hood Red (125569)
Other: Antique Brads (117273),
Tools: Mat Pack (105826), Paper Piercing Tool (116631)

The card base is a 5″ square, matted with Twitterpated DSP. A square (3-1/4″) of Riding Hood Red card was punched with the Scallop Trim Corner on each corner and then the Scallop Trim Border along the edges. Riding Hood Red Ribbon was run along the width of the card using Sticky Strip and leaving sufficient space below for the sentiment. After stamping the partial sentiment in Riding Hood Red ink onto Whisper White card it was punched out with the Word Window, Popped up on dimensionals onto a Modern Label punched from Riding Hood Red card and popped up on the card front with more dimensionals.  The mat pack and paper piercing tool were used to decorate a smaller square of Basic Gray card. After stamping the ornate flower onto Riding Hood Red card with Whisper White Craft ink (and leaving to dry for a little while), the flower was punched out with the Blossom Punch and an Antique Brad secured it to the paper pierced layer before popping up on the punched layer with dimensionals. The layers were popped up on more dimensionals onto the card front.

 Recipe (Inside)

Stamp sets: Mixed Bunch (W125535 or C125537),
Cardstock: Whisper White (106549)
Ink: Riding Hood Red (111836)

For the inside, the flower centres were stamped into opposite corners of the Whisper White insert using Riding Hood Red ink.

Have a great weekend.

Sara xx

A birthday card using my free stamp set

At the Regional Training on Saturday we were all given a free stamp set – Mixed Bunch.

Now I love this stamp set and had a terrible time resisting buying it on pre-order, knowing that I’d be getting it free 6-7 weeks later (that’s a long time!). I’ve been so impatient to get my hands on it and now that I have, I’m not disappointed. There is a matching Blossom punch for punching out the flowers and the 3/4” and 1” Circle punches work with the flower centres, if you don’t want to cut them out by hand as I did here.

Recipe
Stamp sets: Mixed Bunch (W125535 or C125537), TeenyTiny Wishes (W115370)
Cardstock: Island Indigo (124390), Pool Party (124391), Lucky Limeade (124389), Whisper White (106549), Vellum Paper (108631)
Ink: Island Indigo (122937)
Marker: Island Indigo (2011-2013 In Colors 123002)
Punches: Blossom (125603), Scallop Trim Border (118402), Word Window (119857)
Embossing Folder: Vintage Wallpaper (120175)
Other: Basic Rhinestones (119246)
Tools: Big Shot (113439)

The card base is an A6 portrait of Island Indigo card. A panel of the same colour card was embossed with the Vintage Wallpaper, using the Big Shot. Strips of Lucky Limeade card were punched with the Scallop Trim Border and adhered behind the panel before adhering the layers direct to the front of the card. Using Island Indigo ink, the ornate flower was stamped three times onto Vellum Paper and punched out with the Blossom. Three more Blossoms were punched from Pool Party card and the petals were shaped before adding a dimensional between each set of matching flowers. The ornate flower centre was stamped three times onto Whisper White card with Island Indigo ink and cut out by hand. Using the Island Indigo Marker direct to stamp, the sentiment was stamped word by word and punched out with the Word Window. Each word was fashioned into a banner by snipping a “V” into the end. The sentiment was adhered together, then behind one of the flower centres before adhering direct to the flower. Flower centres were also adhered to the other flowers and then all were popped up on dimensionals on the card front, with the sentiment in the centre. Finally, large rhinestones were used to finish each flower.

 Recipe (Inside)
Stamp sets: Mixed Bunch (W125535 or C125537), Delightful Dozen (W122650 or C122652)
Cardstock: Whisper White (106549)
Ink: Pool Party (122938)
Marker: Island Indigo (2011-2013 In Colors 123002)

For the inside, the Whisper White card insert was stamped selectively, using the Island Indigo marker direct to stamp technique, to stamp just part of the sentiment from the Delightful Dozen birthday stamp. The ornate flower from the front of the card was stamped off the insert in the lower right corner using Pool Party ink and then the flower centre was stamped over the edge of the sentiment, after stamping off once to reduce the intensity.

Hope you like this set even half as much as I do Laughing

Sara xx

The rest of the swaps

Today I’m back with the rest of my swaps from the Regional Training on Saturday.

Here are the ones that can lie flat:

And a few 3d swaps that wouldn’t really lay down on the boards:

I had to work flat out from designing my own swap on Thursday morning to finishing them on Friday night (not quite so last minute for me as usual, lol, although I didn’t get my badge  made until very early Saturday morning) to get around 47 of them ready. But it’s so worth it.

I love the opportunity to swap with so many other talented ladies. And yes it was all ladies at Leeds, although I hear that there was a fella or two at one or two of the other training days held across the country.

A very big thank you to everyone who swapped with me – I know how much work goes into your creations.

Sara xx

Name badge and team swaps

Hope you’re having a great weekend. I’m back today to share a few more goodies from yesterday’s Regional Training.

This time round we were asked to create our own name badge for the event. I thought I’d share mine with you, as you could easily make something like this, to go on the door of a child’s bedroom.

Recipe
Cardstock: Brushed Gold (124917), Very Vanilla (106550)
Punches: Boho Blossoms (119858)
Framelits Dies: Labels Collection (125598)
Sizzlits Die: Little Leaves (114511)
Medium Sizzlits Die: Timeless Type Junior Alphabet (115951)
Other: Basic Rhinestones (119246)
Tools: Big Shot (113439)

The Framelits were used to cut the base card from Very Vanilla and the frame from Brushed Gold card, before popping the frame up on dimensionals. My name was die cut from Brushed Gold card, also popped up on slivers of dimensionals on the centre. Little Leaves were die cut from Very Vanilla card, snipped down to just three leaves and adhered direct to opposite edges of the frame. The Boho Blossoms punch was used to create the flowers punching two large and four small flowers from Very Vanilla and two medium flowers from Brushed Gold card. After shaping the flowers, they were layered and popped up on the frame over the leaves with dimensionals. Basic Rhinestones were added to the centres of the flowers to finish them.

And here are the swaps that I got back from my teammates.

From Joanne:

From Mari:

Mari had also made this little gifts for me:

From Krista:

From Hazel:

Still got more swaps to share another day!

Sara xx

My teabag holder swaps for regional training

Yes I’ve been making more tea bag holders Smile but a different design this time and lots of them. All for our Regional Training day which I went to today.

This was one of our occasional annual training days where a big bunch of demonstrators (about 75 of us at the Leeds event) get together to learn new ideas and techniques. And we swap!

I made this alternative version of a tea bag holder (there’s a tutorial for my original version here), using the 2010-2012 In Colors that will be retiring at the end of September.

It opens up to provide two teabags so that you can have “tea for two”.

And here’s the full batch that I made.

I think it was about 47 in total. And so I got quite a batch of goodies swapped in return Laughing

I’ll be sharing some of those swaps and a few other projects from Regional Training over the next few days.

Sara xx

June Blossoms Class

In this class we’ll be covering the brayered embossing technique, to create fun backgrounds for our cards. Everyone will have the chance to make up to four cards. If you’re a beginner, or just like to work more slowly, you’ll be able to finish the cards at home just as long as you have some adhesive.

The £10.00 class fee includes:

  • all materials to make one of each card;
  • face-to-face instruction on the day;
  • lifetime access to online instructions following the class (on production of a valid email address);
  • refreshments.

Bookings have now closed but please stop by again soon for details of upcoming classes or to purchase the online version of this class.