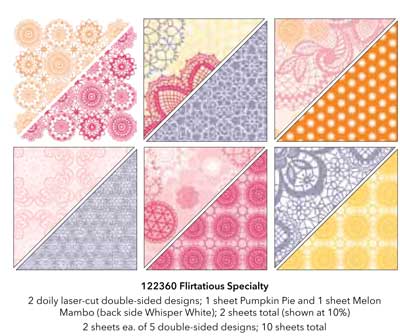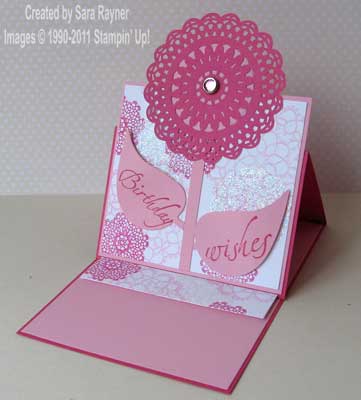
I wanted a girlie card for my friend’s birthday this weekend and so it seemed a perfect excuse to use the beautiful laser cut doilies that are part of the new Flirtatious Specialty DSP.

This DSP pack has 2 sheets each of 5 different double sided designs, plus 1 sheet of Pumpkin Pie and 1 sheet of Melon Mambo, laser cut doilies. The doilies are White on the reverse and so can be brayered any colour you need, to match your project. A full sheet looks stunning but of course you can also cut them into segments as I’ve done here.

Recipe
Stamp sets: Sincere Salutations (105156), Delicate Doilies (W122590 or C122592)
Cardstock: Melon Mambo (119980), Pretty in Pink (106568), Whisper White (106549)
Ink: Melon Mambo (115656), Pretty in Pink (101301), Versamark (106549)
DSP: Flirtatious Specialty (122360)
Punches: 1-3/4″ Circle (119850)
Originals Dies: Leaves 2 (113459)
Other: Heat and Stick Powder (100625), Dazzling Diamonds (102023), Circle Fire Rhinestone Brads (109110)
Tools: Big Shot (113439), Heat Tool (110197), Embossing Buddy (103083), Stamp-a-ma-jig (101049)
The base card is an A6 landscape card of Melon Mambo scored halfway along the front to produce an easel card. A panel of Whisper White card was stamped with two of the Delicate Doilies in Melon Mambo and Pretty in Pink respectively. After sweeping the card with the Embossing Buddy a third Doily was stamped with Versamark ink, covered with Heat and Stick Powder and heat embossed. Dazzling Diamonds were poured over, the excess poured off and then the design was heat set again with the Heat Tool (this only needs a gentle, constant moving heat to just “set” the glitter). A strip of the design was cut off the short edge and set aside to use as the “stopper bar” for the easel. The main panel was trimmed to approximately 3/4 length of the card front leaving a small square extended from the top to attach the “flowerhead” to. This was then adhered direct to a Pretty in Pink mat and then to the bottom half (only) of the card front. A 1-3/4″ Circle was punched from Pretty in Pink card and secured behind a Melon Mambo Doily before securing them to the card front with a pink Rhinestone Brad. A “stem” was cut from Pretty in Pink card and adhered below the flower. Leaves were die cut from Pretty in Pink card using the Big Shot and were stamped with the sentiments using the Stamp-a-ma-jig. These were adhered flat at the base of each leaf and popped up on a dimensional at the tip of each. A Pretty in Pink insert was adhered inside and the retained doily stamped strip was popped up on dimensionals for the easel to rest against.
A bit more complicated than yesterday’s card, but my friend’s worth it 😀
Sara xx


0 Comments