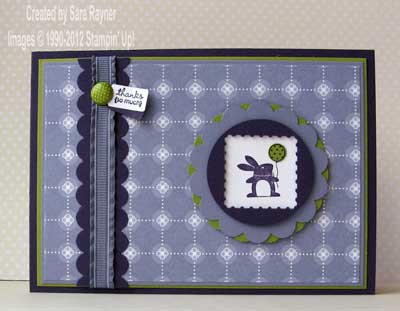
The new Perfect Postage stamps are so sweet but as they’re small stamps I wasn’t sure they’d stand up to being the main focus on a standard size card. So how to make them seem bigger? Add a frame!
Or in this case layered frames to make the embellishment larger. I also used a DSP for the background, that has a repeated circular motif, echoing the scallop circles (the new larger size one from the Mini) and filling the space.
It’s amazing what a few layers add. If you can visualise the postage stamp on it’s own on this card, it would look pretty lost but I don’t think it does here, do you?

Recipe
Stamp sets: Perfect Postage (W126111 or C126113), Tiny Tags (W118091 or C118592)
Cardstock: Elegant Eggplant (108614), Wisteria Wonder (124389), Lucky Limeade (124388), Whisper White (106549)
Ink: Elegant Eggplant (105210),
DSP: Berry Blossoms (122350)
Punches: Scallop Edge Border (119882), Postage Stamp (122344), 2-3/8″ Scallop Circle (118874), 1-3/4″ Circle (119850), Jewelry Tag (117190), Owl Builder (118074)
Ruffled Ribbon: Wisteria Wonder (122973),
Other: Designer Printed Brads (122940)
Tools: Crop-a-dile (108362)
The card base is Elegant Eggplant. Berry Blossoms DSP was matted onto Wisteria Wonder and then Lucky Limeade card. A strip of Elegant Eggplant card was punched on both long edges with the Scallop Edge Border and adhered to the matted layers. Wisteria Wonder Ruffled Ribbon was wrapped around the Scallop Border and secured on the reverse. The Thanks sentiment from the Tiny Tags set was stamped in Elegant Eggplant ink onto Whisper White card and punched out with the Jewelry Tag. This was layered with another Jewelry Tag punched from Elegant Eggplant card and secured through the ribbon with a Lucky Limeade printed brad. The layers were then adhered direct to the card front. Large Scallop Circles were punched from Lucky Limeade and Wisteria Wonder card and adhered together, offsetting the petals. The rabbit from the Perfect Postage set was stamped in Elegant Eggplant ink onto Whisper White card and punched out with the Postage Stamp. After stamping just the balloon, in Elegant Eggplant ink, onto Lucky Limeade card, it was punched out with one of the “eyes” from the Owl Builder punch and adhered over the balloon in the full image. This was adhered direct to the centre of the Scallop Circles and popped up on dimensionals on the card front. A Postage Stamp was punched from Elegant Eggplant card and then the 1-3/4″ Circle was centred over the aperture and punched again to create the frame. This was popped up over the bunny with slivers of dimensionals.
Why not try this approach with one of your own small stamps? I’d love to see your results so please leave me a comment if you do.
Sara xx


0 Comments