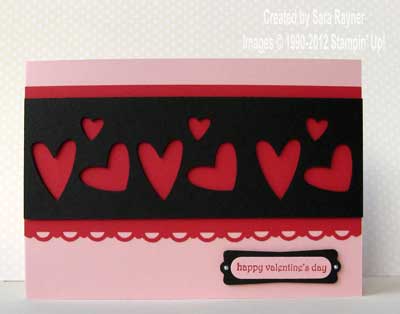
Over the next 7 days I’m going to be sharing a valentine project each day. Now don’t worry if you don’t celebrate valentine’s day for any reason, there’ll still be something for you. All the designs can work equally well for a wedding, engagement or anniversary, simply by swapping the sentiment (and possibly the colour combination for some of the projects).
Today’s card is a very easy one that I shared with a group of beginner cardmakers in their lunch hour yesterday. They all got great results and were surprised at just how easy it was. I may have a few converts 

Recipe
Stamp set: Teeny Tiny Wishes (W115370)
Cardstock: Blushing Bride (121690), Real Red (106578), Basic Black (101179)
Ink: Real Red (103133)
Punches: Heart to Heart (119881), Scallop Trim Border (118402), Modern Label (119849), Word Window (119857)
Other: Basic Pearls (119247)
The card base is an A6 landscape of Blushing Bride. A strip of Real Red card was punched with the Scallop Trim Border across the bottom and adhered direct to the card front. A slightly narrower strip of Basic Black card was punched with the Heart to Heart, three times. The centre trio was punched first, ensuring there was the same amount of card extending from each side of the punch, then the two outside trios were punched (but the aperture strip still looks great if you don’t get it punched evenly or if there’s overlap) . This strip was popped up on slivers of dimensionals over the Real Red border. After stamping the sentiment in Real Red ink onto Blushing Bride card, it was punched out with the Word Window and adhered direct to a Modern Label punched from Basic Black card. Teeny Basic Pearls were added to each end of the sentiment and then it was popped up on the card front with dimensionals.

Recipe
Stamp set: I {Heart} Hearts (W117010 or C118571), Valentine Love (W122695 or C 122697)
Cardstock: Whisper White (106549)
Ink: Real Red (103133)
Punches: Full Heart (119883)
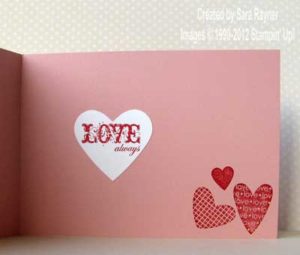
For the inside, the trio of hearts was stamped in the corner in Real Red ink (there’s no need to get this image “straight”). To ensure we got our inner sentiment straight, we stamped it onto Whisper White card with Real Red ink, then punched it out with the Full Heart and adhered it direct to the inside of the card.
Easy! This would also make a great project for the kids if they’re wanting to make valentine cards
Tomorrow I’ll be back with another valentine project – this one a little more complicated.
Sara xx


0 Comments