Here we go! I can now share our new Summer Mini Catalogue with you online. Just click on the image above (or the button over on the right of the page) to have a browse.
And welcome to our Summer Mini Catalogue blog hop. Again, a bunch of us from over at the In Love With Stamping forum, have joined together to put on a great hop full of inspiration for you today. A big thanks to Alison for organising this.
If you’ve joined me from Elaine’s blog, then thank you for stopping by, weren’t her Blossom cards fantastic! If you’re starting here, then by clicking the links to the next blog, and the next, and the next, you’ll be able to work your way around this mega hop of around 19 blogs until you get back here. Then, if you have the stamina  , there’s another separate loop of 19 that starts here.
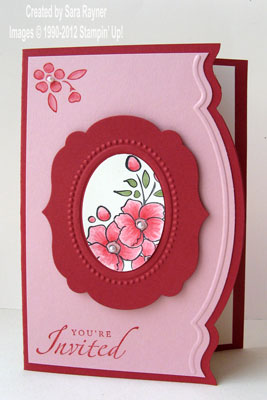
So – onto the projects. The first is the invitation that I sent to all my recent hostesses to invite them to a special hostess appreciation event. It uses the new Adorning Accents Edgelits and Embossing Folders and the Framelits Dies. These are so gorgeous for making elegant cards!
Recipe
Stamp sets: Bordering on Romance (W125480 or C125482), Sincere Salutations (W105156)
Cardstock: Riding Hood Red (116205), Blushing Bride (121690), Very Vanilla (106550)
Ink: Riding Hood Red (111836), Blushing Bride (119786), Pear Pizzazz (119784), Black Stazon (101406)
Punches: Extra-Large Oval (119859)
Framelits Dies: Labels Collection (125598)
Edgelits Dies: Adorning Accents (125595)
Embossing Folders: Adorning Accents (125601), Designer Frames (123130)
Other: Basic Pearls (119247)
Tools: Big Shot (113439), Blender Pens (102845)
The card base is an A6 portrait of Riding Hood Red and the opening edge was shaped with the curvy Adorning Accent Edgelit Die run through the Big Shot. A mat of Blushing Bride card was shaped the same way and then embossed with the matching Embossing Folder (when using them in combo, cut first, then emboss). This mat was then stamped with the sentiment from Sincere Salutations and the small flower from Bordering on Romance, both in Riding Hood Red. The flower was coloured in with the Blender pen and Riding Hood Red ink and topped with a Pearl. After stamping the large flower onto Very Vanilla card with Black Stazon ink, it was punched out with the Extra-Large Oval and coloured with the Blender Pens using Riding Hood Red, Blushing Bride and Pear Pizzazz inks. One of the medium Labels Framelits was used to die cut Riding Hood Red card and then run through the Big Shot using the oval Designer Frame. The stamped image was adhered direct to the centre of the frame and then both layers were popped up on dimensionals in the centre of the card front. More Pearls were used to finish the flowers.
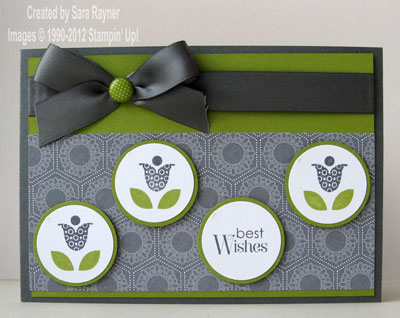
Next, we have the Make and Take that everyone made at the event. They loved the colour combo, which I’d stolen from the local Estate Agent’s For Sale signs (inspiration is everywhere, lol). The sketch is also a steal, from a recent MojoMonday sketch (if you’re going to steal, steal wel,l heehee). The card combines the new Twitterpated DSP and the Bright Blossoms stamp set (an absolute bargain priced set), with existing punches from your craft storecupboard.
Recipe
Stamp sets: Bright Blossoms (W125495 or C125497), Petite Pairs (W122495 or C122497)
Cardstock: Basic Gray (121689), Lucky Limeade (124388), Whisper White (106549)
Ink: Basic Gray (109120), Lucky Limeade (122935)
DSP: Twitterpated (125406)
Punches: 1-1/4″ Circle (119861), 1-3/8″ Circle (119860)
Satin Ribbon: Basic Gray (124326)
Other: Designer Printed Brads (122940)
Tools: Mat Pack (105826), Paper Piercing Tool (116631)
The card base is an A6 landscape of Basic Gray. Basic Gray Satin Ribbon was wrapped around the top of a mat of Lucky Limeade card and secured on the reverse and then a faux bow of the same ribbon was attached to it with a Designer Brad. A strip of the Twitterpated DSP was adhered direct below the ribbon and the layers were adhered direct to the front of the card. The little leaves were stamped three times onto Whisper White card with Lucky Limeade ink and then the tulip heads stamped over the top with Basic Gray ink. Basic Gray ink was also used to stamp the sentiment onto Whisper White card. All the flowers and the sentiment were punched out with the 1-1/4″ Circle and matted onto 1-3/8″ Circles of Lucky Limeade before popping up on the card front with dimensionals.
Recipe
Stamp sets: Bright Blossoms (W125495 or C125497), For My Family (W124403 or C124405)
Cardstock: Whisper White (106549)
Ink: Basic Gray (109120), Lucky Limeade (122935)
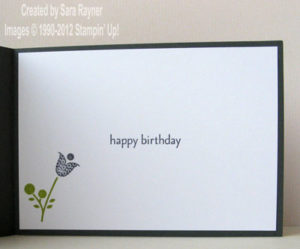
For the inside, a Whisper White insert was stamped with the sentiment in Basic Gray ink. The stem was stamped in Lucky Limeade and then another tulip head, to match those on the card front, was stamped in Basic Gray ink.
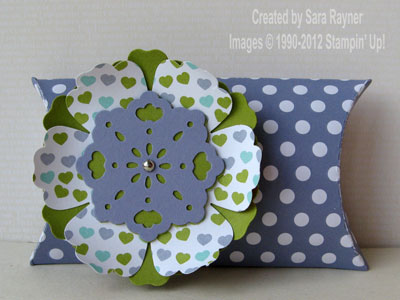
Finally, here’s one of the treats I gave my hostesses. This uses the new Sweet Shop Specialty DSP. Each pack comes the two sheets each of the embossed designs (this spotted Wisteria Wonder and a Calypso Coral with hearts). The embossing alone is lush (you can’t really pick it up from this pic I’m afraid) but I wanted to show that these embossed papers aren’t actually papers at all, they’re more a lightweight card and therefore quite suitable for making small boxes.
Recipe
Cardstock: Lucky Limeade (124388), Wisteria Wonder (124389)
DSP: Sweet Shop (125408)
Punches: Blossom (125603), Doily Triple Layer (122465)
Bigz Dies: Pillow Box (113466)
Other: Mini Brads (122941)
Tools: Big Shot (113439), Bone Folder (102300)
The Pillow Box die was used to cut the shape from the Sweet Shop DSP and the box was assembled (simply add adhesive along the tab, stick and fold into shape – very easy). Blossoms were punched from Lucky Limeade card and one of the other Sweet Shop papers and the petals shaped with the Bone Folder. The Doily Triple Layer punch was used punch a plain flower from Lucky Limeade and a full doily one from Wisteria Wonder card. All the flower layers were layered together, offsetting some petals and matching others and all were secured with a Mini Brad. The flower was then popped up on the box with dimensionals.
Thank you so much for stopping by. If you’ve enjoyed my projects then please bookmark my page or why not sign up for my free newsletter (the sign up form is above, on the right). If you’d like to order supplies to make any of the projects please email me.
Now I’ll pass you on to the next stop in the hop, which is my talented upline, Joanne, who has a gorgeous vintage card to show you, with beautiful distressing techniques.
Sara xx


love your colour combos and that is excellent use of the edgelits die!
Love your colour combos.
Gorgeous cards, love your colour combos.
Love your projects and the colour combo from the for sale sign is great!
Very pretty projects Sara. X
Lovely inset in that first card, will have to give it a go!
Gorgeous cards Sara. I love the one you used for your make and take.
Beautiful cards, love the limeade & basic grey card, gorgeous colour combo!!
Fab projects especially love the Grey and Limeade colour combo!
Gorgeous projects Sara, I bet your hostesses had a wonderful time. Love your idea of using the embossed paper for the pillow box.
Love the designer frame in the Framelit, Sara! Gorgeous projects! x
Gorgious projects Sara! Jan x
Fabulous cards…I think they are stunning. The colour combination with the limeade and grey Twitterpated DSP is just fantastic.
Cxx
Lovely projects and I especially loved the colour combo in the second project
Wondeful projects. I love the grey/green card. A xx
Wow, these are gorgeous Sara….and i didn’t realise that limeade works so well with grey. Lovely.x