Hello and welcome to our SUDSOL blog tour today. We’re showcasing some of the lovely new products available in the both the Spring/Summer Catalogue and Sale-a-bration, so pour yourself a cuppa, put up your feet and enjoy!
Not heard of SUDSOL before? It’s Simply Unique Demonstrators Sharing Online
I joined SUDSOL a several years back for the 24/7 access to inspirational ideas, project instructions and templates that I can use to WOW my workshop guests and hostess and jumpstart my mojo when I need it (you can see some of my creations in my SUDSOL gallery here) . SUDSOL offers a free two week trial membership to SU! demos around the world, just click here to sign up.
If you’re not a SU! demo then please still take a look at the projects on the tour for inspiration for your own creations, or why not book a workshop and see them first hand?
My projects all use the Good As Gold Card Kit – free with a £45 purchase in our Sale-a-bration. The kit contains 8 card bases, envelopes, liners, elastic cord, baker’s twine and a sheet of die cut tags.
Whilst the kit is perfect for beginners, it’s also a great craft cupboard standby for experienced crafters, as it can be stepped up quickly and easily. I want to show you why it shouldn’t be overlooked 
First up is a simple beginner card.
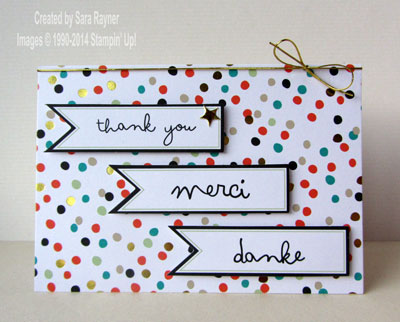

The die cut tags include sentiments in english, french and german. All three, in the same colour scheme, were popped up on dimensionals on the pre-printed base card. The gold star from one for the die cut tags was glued to the english tag to draw attention to it. Gold Elastic Cord was tied in a bow around the top of the card.
Tip – The gold liners that come in the kit reach all the way down into the envelope – beyond where they’ll be seen, so I trimmed some off to use as extra gold foil on these and other projects.
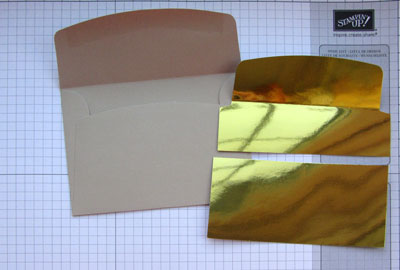

By adding just a few scraps of card and some punches you can step up the basic card in the kit.
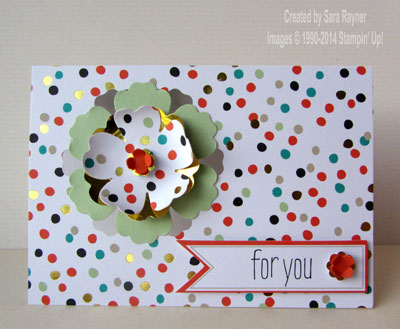

The Blossom punch (125603) was used to punch an aperture in the base card. It was also used to punch a flower from Pistachio Pudding card which was then adhered, offset, across the aperture. The Pansy punch (130698) was used to punch flowers from the gold foil (see tip above) and from the punched out Blossom. These were curled over a bone folder, adhered together and popped up on a dimensional in the centre of the flower. A die cut tag was popped up on the card front with dimensionals. Itty Bitty flowers (118309) were punched from gold foil (many petalled) and Tangerine Tango card (four petalled), adhered together and popped up in the centre of the flower and on the sentiment tag.
This same idea can be used with any nesting punches. Here’s the same card done with Circles.
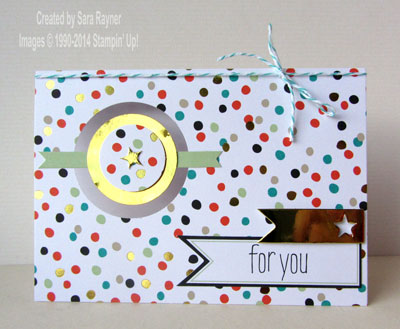

The aperture was punched with the 1-3/4″ Circle (119850) then one of the die cut banners was trimmed and fastened across the aperture to support the other circles. The 1-3/8″ Circle (119860) was punched from gold foil and the 1″ Circle (119868) from the punched base card. A gold tag was popped up on dimensionals over the sentiment tag and the staff from the centre of it adhered in the centre of the circles. Included Baker’s Twine was tied in a bow around the top of the card.
To step to up just a stage further, a few supplies from the Spring/Summer and the main catalogue were added.
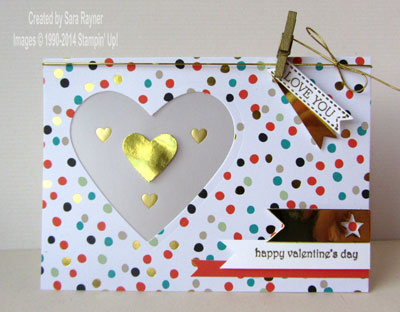

Hearts Collection framelits (125599) were used to cut the aperture and the central heart from gold foil. Gold vellum sheet (133363) was placed behind the aperture. The valentine’s sentiment from Teeny Tiny Sentiments (Wood 130042 or Clear 120024) was stamped onto Whisper White card with Versamark ink (102283), heat embossed with Gold EP (109129) and trimmed to a banner. This was popped up on dimensionals on the card front, with other banners from the kit. The sentiment from Itty Bitty Banners (Wood 132022 or Clear 126257) was stamped onto Whisper White card and heat embossed with Gold EP. This and another matching banner from gold foil were die cut with the matching Bitty Banner framelits (129267) and pegged onto tied gold elastic cord with a Mini Metallic Clothespin (133320).
Finally, we’re also thinking outside the box, or at least of it 


The card can be turned into a little matching box/bag.
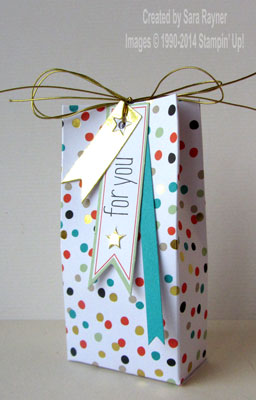

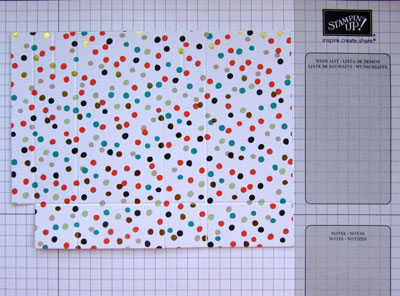
Trim 1/2″ from the long edge of a base card from the kit (so that it measures 6-1/2″ x 5″) . Place the card on the Simply Scored Board (122334) with the long edge at the top. Score all the way down at 1/2″, 2-1/2″ (the card is already scored at 3-1/2″), 5-1/2″. Score just 1″ down at 1″ and 4″. Turn the card so that the short edge is at the top of the board (and the 1″ scores are to the right) and score at 1″. With the box in landscape orientation, trim away the smallest scored rectangle at the base and snip up each other scoreline as far as the horizontal scoreline.

Fold along all scorelines and adhere the box together. Punch a hole in the centre of the top of the box and tie on the tags with doubled over gold elastic cord (all from the kit).
I hope I’ve shown how versatile this seemingly basic kit can be and don’t forget you can get a free two week trial membership to SUDSOL.
I’ll pass you on now to the next stop in our blog tour.
CONTINUE on the Blog Tour |
|
Thanks for stopping by.
Sara xx



Great box! I am looking forward to making this!
WOW!! great projects! Love the tip about the envelope liners–thanks!
I really enjoyed the different ways you used the materials in this kit. Fun blog post!
You really stepped up the use of Good as Gold! Each project got better and better. Thank you for sharing.
Great idea to trim the gold liners! I pinned your idea for the box so I don’t lose it. I stopped by on the blog tour!
Sweet projects Sara! I especially love the gift bag 🙂
Lovely projects – I love how you stepped up the ‘Good as Gold’ kit, which I just love. Thanks for the tip about using the excess gold paper from the envelope liners 🙂