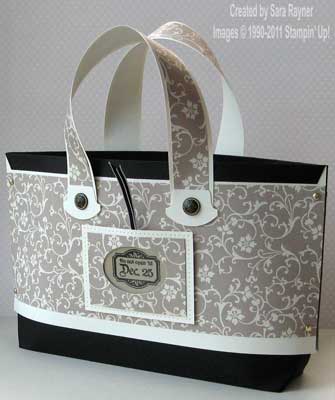
A last Christmas post for you. And this one only because it can so easily be used all year round, just by changing the tag in the pocket 
This is the gift bag that I made for my MIL, whilst DH was busy making their card. Totally worth it though. She was absolutely made up with it and quite possibly liked the bag better than the scarf that was in it 
She can even reuse the bag to gift to someone else if she makes another tag to go in.
The pattern came from a fabulous US demo, Connie Babbert, and she has a free tutorial and template for it here. One of my fabulous team, Jan, also made a version of this for me at one of our get togethers earlier this year (you can see her version here). I adapted mine a little from both of theirs, by changing the handles and adding the little gift tag pocket.

Recipe
Stamp set: Winter Post (W111780)
Cardstock: Basic Black (121688), Very Vanilla (106550), Brushed Gold (124917)
Ink: Versamark (102283), Basic Black (101179)
DSP: Mocha Morning Specialty (122366)
Punches: Round Tab (119864), Extra-Large Oval (119859)
1/8″ Taffeta Ribbon: Basic Black (119261)
Other: Black EP (109133), Antique Brads (117273), Gold Brads (104337)
Tools: Mat Pack (105826), Paper Piercing Tool (116631), Heat Tool (110197), Crop-a-dile (108362)
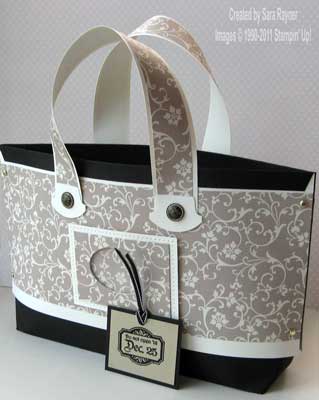
The main tote bag was made as per Connie’s instructions using Basic Black and Very Vanilla card and Mocha Morning Specialty DSP with Gold Brads to strengthen and secure the sides. The handles were made by matting a strip of Mocha Morning DSP onto a slightly wider strip of Very Vanilla card, covering the ends with a half a Round Tab punched from Very Vanilla card and then securing them in place with Antique Brads. For the pocket a rectangle of Very Vanilla card was punched with the Extra-Large Oval, this was then used as a template to punch another oval of the same size from a mat of Mocha Morning DSP. A small piece of Window Sheet was sandwiched between the two and the Vanilla layer was pierced with a decorative border using the Paper Piercer and Mat Pack. The edging pieces from dimensionals were used to pop the pocket up on the bag front, allowing room for the tag. A rectangular tag of Basic Black card was cut a little smaller than the pocket to allow for the dimensionals. Using Versamark ink the sentiment was stamped onto a mat of Brushed Gold card and heat embossed with Black EP. A mat of Very Vanilla was stamped with the To/From sentiment in Basic Black ink and these were adhered direct to each side of the gift tag. Finally a hole was put in the tag with the Crop-a-dile and Basic Black Taffeta Ribbon threaded through to lift the tag in and out of the pocket.
Here’s the tag out of the pocket.

Right – that’s it for Christmas projects … for a few months at least!
I’ll be back tomorrow with a sneak peek from our new Mini Catty that launches on 4 January. I can’t share the catalogue yet and I’ll not be able to give details (so no recipe I’m afraid) but I can share a pic of a finished project. Yay!
Sara xx


A beautiful bag Sara, no wonder MIL liked the bag more than the scarf!
LOVE, LOVE, LOVE your bag!!! Great idea with the tag on front! Thanks for the shout out for the purse tutorial on my blog, too!!!