
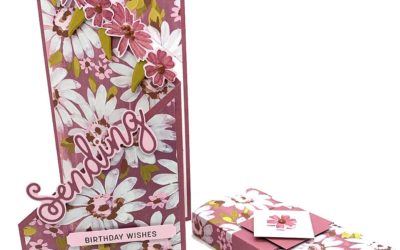
When I shared this card a few days ago I promised that I’d provide a tutorial on making the flower and so here it is. This is another project that’s great for using up scraps of card and DSP and can be used with any flower/scallop circle style punch. Bear in mind though that these flowers really are 3d and are best presented boxed or in a bagalope or similar as a normal envelope would squish the flower.
 1. Punch out a selection of flowers. I recommend 9 or 10 in total. If using all card then you can use a few less, if using all DSP then you may need a few more to get the flowers to “bunch” to the right depth. These flowers were double punched following my tip here, giving a more crinkly edge to the flowers and making them more carnation like. I used (left to right) Springtime Vintage DSP, Very Vanilla, Pink Pirouette and then for the base petals, Rose Red. The darker colour on the bottom helps give definition and “pop” to the flower.
 2. Crumple all the flower layers by scrunching them up in your hand and then unfolding them again. I usually spritz them with water to make the crumpling easier. (For the birthday card I spritzed with a mixture of rubbing alcohol and Champagne Gold shimmer paint to give a subtle sheen to all the flower layers).
 3. Pile all the flower layers together, alternating the colours, pierce a hole through the centre (with Paper Piercing Tool or Crop-a-dile) and secure with a brad. The colour of the brad isn’t important as it will be covered by all the scrunched layers.
 4. Working from the top, down through the layers, scrunch up each flower into the centre and scrunch the next layer tightly around it. Carry on working down until the bottom darker layer is scrunched around the whole.
The flower can now be added to your project using a strong glue (eg. several glue dots or Tombow/Crystal Effcets, applied and left to dry).
 For a more glam flower, run a wet glue around the edges of the petals, dip into Dazzling Diamonds and leave to dry.
Have fun creating your 3d flowers. Please send me a pic of your finished flower, I’d love to see how yours turns out.
Sara xx

Thanks for the idea Mary. Can’t promise when it will be posted, but I’ve put it on the list and I’ll do a tutorial on it some time soon 🙂
lovely flowers would love to see a rose being made